Industrial Ovens
Front-Loading
![]() Under 10 cubic feet
Under 10 cubic feet
![]() 10-20 cubic feet
10-20 cubic feet
![]() Over 20 cubic feet
Over 20 cubic feet
![]() See All
See All
Top-Loading
![]() Under 10 cubic feet
Under 10 cubic feet
![]() 10-20 cubic feet
10-20 cubic feet
![]() Over 20 cubic feet
Over 20 cubic feet
![]() See All
See All
Learn About Our Industrial Ovens
Welding Ovens
![]() CONEX Storage
CONEX Storage
![]() Stick Electrodes
Stick Electrodes
![]() Sub-Arc Flux
Sub-Arc Flux
![]() Wire Spools
Wire Spools
![]() Tig Filler Wire
Tig Filler Wire
![]() Multi-Purpose
Multi-Purpose
![]() Nitrogen Purge
Nitrogen Purge
![]() See All
See All
 Order Our Free Catalog Today Click Here |
| Available Inventory |
<Basic Welding Terms - Part-2Non Ferrous - Does not come from iron ore. It is mined pretty much in its true form such as copper, aluminum, nickel etc. Nozzle - A brass attachment that is about three inches long and shaped as an open cylinder. It is put over and insulator (to keep the nozzle from being electrically charged which would short out on the PARENT METAL and shock the heck out of someone not using a glove.) and seals at the top giving the shielding gas one direction to go…out over the weld. It is real important to continuously clean built up SPATTER from out of the NOZZLE. Anti-spatter sprays and dips help keep the spatter from sticking to the inside of the nozzle which blocks the SHIELDING GAS. Open Circuit - Cross your arms across your chest. Now uncross them. When they are crossed, they are like a "CLOSED CIRCUICT." When they are not crossed, they're like an open circuit. When the switch on the welding machine is open, it is not completing the circuit, therefore electricity can not flow. When it is closed, the switch joins the two conducting parts completing the circuit, allowing electricity to flow across. Oscillate
- While dragging (back hand) or pushing (fore hand) the weld PUDDLE, you oscillate
by moving side to side. (Think of an oscillating fan.) This feathers, or washes
in the sides of the PUDDLE into the PARENT METAL. Overfill - Similar to overkill, many welders think the more the weld deposited, the better the weld. Overfill is a waste of time and material, and can weaken the steel by placing too much heat on the joint. (Opposite of this is UNDERFILL) Parent Metal
- also called "base metal", this is the metal or steel that you
are actually welding on.
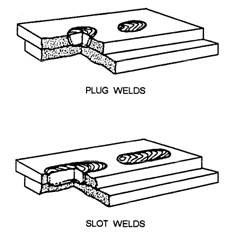
Plug Weld - Say you have two pieces of steel you want welded together. One has a hole in it, the other doesn't. You lay the whole piece on the solid piece, and then weld in the hole making sure you burn into the bottom piece. You can either make one weld at the bottom of the hole (properly TIED-IN of course) or fill the hole in flush. I spent two full weeks at a power house plugging holes. After it had been damaged by a tornado, it was decided to weld all the gusset plates and connections that were usually bolted. They then had us remove the bolts and put plugs into the holes, which served no structural value, but were for aesthetics only. To this day, I wonder why the heck they didn't just leave the bolts in! And I still can't believe I repeatedly risked my life working in very high, awkward situations, just to plug a dad gummed hole! Polarity - Back in the day, we referred to the flow of current as STRAGHT POLARITY and REVERSE POLARITY. In SP, the electricity flowed out of the STINGER and into the WORK CLAMP. In RP, the electricity flowed out of the WORK CLAMP and into the STINGER. For a better explanation see DIRECT CURRENT ELECTRODE NEGATIVE and DIRECT CURRENT ELECTRODE POSITIVE, what we now use instead of POLARITY. Porosity - Referred to as worm holes, these are gas pockets trapped in the weld. A couple of reasons would be from not enough shielding gas in MIG, or moisture in the FLUX in 7018 low hydrogen rods. The moisture can easily be prevented by using one of Keen's rod ovens. See How to Store Rods Properly… http://www.keenovens.com/articles/store-rods.htm Ports
- In a mig gun there are small orifices (holes) that allow the flow of shielding
gas. The NOZZLE then directs the gas out over the weld PUDDLE. Pre Heating - Some steels will accept the weld better, and the weld will be more sound if the steel is heated before being welded on. This is especially true up North in the winter time. Adding hot filler metal to cold steel is NOT a good idea because it could cause the steel to become brittle and crack. Most of the time the weld specs will tell you what the PRE-HEAT temperature is. One way of checking the steel is with heat pencils which melt at certain temperatures to show when the right heat is achieved. See CRACKING. Post Heating - I know, I know, it ain't in alphabetical order, but I just couldn't put POST-HEAT in front of PRE-HEAT 'cause it just doesn't work that way. Post-heat is of course, exactly what it sez…heating it up after you have welded. Actually what you
are doing is controlling the cool down of the steel. Instead of letting it cool
down on its own, you heat it periodically and slow down the cooling process. Here's a great site from Lincoln on cast iron welding. Puddle - Ahhh, the puddle. My welding instructor used to drill into my head "RELAX your hand and WATCH the PUDDLE!" The PUDDLE is the same as the WELD POOL. It is the molten filler metal that is combining with the PARENT METAL. You have to see it and manipulate it to make a good weld. The
following excerpt is from TheFabricator.com…
RELAX YOUR HAND Quench - Rapidly cooling the steel to make it harder. The steel has to have enough carbon in it for it to harden. Mild steel can't be quenched to harden it because it has only .33% carbon in it. You need about .70% to be able to harden by quenching. You are changing the crystal structure from one atomic pattern to another. I've touched on this in http://keenovens.com/articles/heat-treating-2.htm. A very good article on hardness and quenching can be found at eFUNDA's engineering company site. Radiation - The welding arc puts out radiation that you must protect yourself and others from. It is important that you announce to others that you are preparing to strike and arc. In my shop we holler "WATCH YOUR EYES!!!" That means it's up to you to look away from whoever just said it. See FLASHBURN. Besides burning your eyes, the radiation emitted from the arc can also burn your skin similar to a sunburn. You should always cover your skin with dark colored cotton, wool, or leather. Repeated radiation burns of the skin can result in skin cancer later in life, which is a very fast growing, and deadly form of cancer. Radiography - Is the enemy of bad welders. The weld is x-rayed and it will show even the minutest WELD DEFECTS. (Slag inclusion, porosity, or undercut!) Rods - See ELECTRODE.
What we call electrodes in the shop or field. Nobody asks for more "electrodes",
they ask for more rods. Just like the actual term is "SMAW", in the
shop or field we call it "Stick Welding." So, if I'm "stick welding",
I'm using "rods." Safety - ahhhhh Grashopper, this is absolutely the MOST important part of welding, the safety of you AND others! Welding has all kinds of inherent dangers. I've had quite a few smashes, bumps, bruises, cuts, scrapes, shocks etc. But the worst was when I was knocked off of the 3rd floor of a building (well, actually right below the 3rd floor, but who's counting?) and shattered my ankle. However, although dangerous by nature, it can be relatively safe if the proper safety practices are followed, AND common sense is used. One of my pet peeves is all the different shows on TV that show people blatantly disregarding safety. All it takes is a split second to be hurt, or hurt someone else. And usually it would've just taken a moment to do it right, or get the right tool, or protective gear. There are all sorts of books, articles and guides to welding safety. Just remember that you can get yourself and others hurt or killed if you don't learn and follow these practices. Two of the accidents that I hear about almost every year are eye injuries (from not wearing the proper protective devices) and people hurt or killed from welding on or near containers. Welding/Cutting on or near a container that you don't know about is dangerous in three ways… It can be toxic, flammable, and or explosive. NEVER, NEVER, NEVER weld on a container that is not either new steel, or has been cleaned and safety certified. I don't weld on used containers PERIOD. Ain't worth life or limb to make a dang barbeque! Also, on cars or trucks, gas tanks should be removed or made sure to be full so they don't explode. If it is full, the most it could do is burn. If there are fumes and a wayward spark, or current traveling the wrong way, you might just wake up DEAD! http://www.hobartwelders.com/pdfs/ms199776b.pdf Seam Weld - The seam is right where the two plates, strips, etc. touch. It is important that you get half of the WELD POOL on each side of the seam. In ARC GOUGHING (where you are cutting an existing weld out) you want to cut through the weld until you see the seam which will appear as a crack. This is where the two pieces meet. The cut is on the weld with little damage or heat to the plates.
Semi-Automatic Welding – MIG is an example. The machine runs the wire (FILLER METAL) and supplies the SHEILDING GAS automatically, but it takes a person to pull the trigger and manipulate the gun to make the weld. Seventy-five / Twenty-five – 75% Argon / 25% Carbon Dioxide, see SHEILDING GAS. Shielded Metal Arc Welding – See also STICK WELDING. SMAW, is the process where we use ELECTRODES or RODS. Although some of the other processes are more efficient, there are some jobs where SMAW is the most practical, like climbing around on a high-rise office tower, shopping centers and large spread-out structures. See the following for advantages/disadvantages involved… http://www.thefabricator.com/ArcWelding/ArcWelding_Article.cfm?ID=584 http://www.thefabricator.com/ArcWelding/ArcWelding_Article.cfm?ID=3 Shielding Gas – Gases such as argon or helium are inert, meaning they will not combine with other elements. This makes them good for keeping atmospheric contaminants out of the WELD POOL. Carbon Dioxide is not inert, but effective and used in MIG either by itself, or mixed with inert gasses such as 75/25. Carbon Dioxide gives a deeper penetrating weld, while 75/25 gives a smoother appearing bead and less SPATTER than pure CO2. Skip Weld – A sequence used to control warping (distortion). Once on a parking garage there were big beams made of concrete with steel gusset plates on each end to be welded to gusset plates on the columns. Concrete is never completely cured, it has moisture in it. If you get a cutting torch close to it, or excess heat from welding, it will blow up and send little concrete shrapnel shooting out like a dad gummed fragmentation grenade. If we woulda' welded those plates solid, it would've blown concrete out from around the plate and weakened the connecting points big time. So instead, we skip welded the plates. We'd weld a couple of inches at the top, couple at the center and a couple at the bottom. We'd let that cool, and then do it again until the plate was welded solid. It's all about keeping it cool dude. Slag – when the FLUX on a welding ROD melts it produces the SHEILDING GAS to protect the weld, and then forms a hardened protective coating over the weld. This has to be chipped off and thoroughly cleaned, usually by brushing. Slag Inclusion – If you don't properly clean the SLAG from a BEAD, you run the risk of it becoming part of the weld when you run the next bead. A good welder will generally burn it out on the next pass, but if not, there will be a chunk of slag in the bead which leaves a weak spot. Slag inclusions are one of the main WELD DEFECTS. Slot – Slot welds are just like PLUG WELDS except instead of being round, they are elongated. (Long and narrow.) Again Integrated Publishing has a good picture of ‘em…
Smart Talk – When you have a boss who doesn't know diddly-squat trying to talk like he is smart. Although this is usually very irritating, it can also be quite amusing as well. Apprentices and politicians are also notorious for this. Soapstone - A soft stone that is pretty much compressed talc which makes it excellent for marking on STEEL. Solidus
- A SMART TALK way of saying solid. You can also use rolls of FLUX CORE (FCAW), STAINLESS STEEL (SST), and Aluminum (Al). Rolls come in a couple of pounds, five, ten, twenty, thirty-three, and forty-four pounds that I know of. Off the top of my head I'd say you can get wire rolls at your local welding supply store, some hardware stores, Loews, Home Depot, Harbor Freight, Northern Tools, and Grainger. Spatter - When you weld, especially with the MIG process and 60 series RODS, the arc force blows small droplets of FILLER METAL out onto the surface of the PARENT METAL. In MIG welding you want to either spray the inside of the nozzle with aerosol, or dip it into a gunky substance that coats the inside to keep the spatter from sticking. If spatter builds up in the nozzle, it will obstruct the flow of the Shielding Gas. If using nozzle dip, you wanta' heat the nozzle by running a few passes first or you'll just have a nozzle full of gunk. If the spatter chips off easily, it's no big deal, if the spatter won't chip off, your temperature is too hot. Also, if you are working on artwork or something that you really don't want spatter to get on, you can spray the PARENT METAL or spread the gunk on it and it will keep the spatter from sticking. One of the stupidest/craziest/nonsensical things that happened in my teaching career was a student eating a glob of nozzle dip. It was nasty dirty from months of use, and out of the blue, he ate it. Luckily it was not toxic and somehow did not make him sick. When I asked him why he did it, he just looked at me with a weird smile on his face! Spot Weld - Used on thin gauge metal like car bodies, you have a couple of prongs that grip the steel kind of like a pair of pliers. In between is a small glob (I like that word.) of FILLER METAL. The prongs shoot current through the steel melting the filler metal while firmly holding the steel together. As long as it's set right, it will melt the filler metal and make a very small, yet strong weld. If it's set too cold, the weld won't hold. If it's set too hot, it'll just wash the "glob" of filler metal away, or burn through the steel. It's a good idea to use it on some scrap pieces of steel to get the AMPS right before doing the real deal. Steel - Steel is iron ore mined from the ground, purified in blast furnaces, and then carbon added in its molten stage. If called for, ALLOYS can also be added while molten. See Steel Furnance Article. Stick Welding - See SMAW and http://keenovens.com/articles/stick-welding.htm. One exception was when we used AC machines to run 6011 RODS at a black iron plant I worked at. Stiffening plates (plate put in the web of a beam to give it extra strength and keep it from sagging) that we routinely put in could be done with 6011 and it was cheaper using AC current. On most everything else there we used DC with 7018, or FLUX CORED ARC WELDING. In the Iron Workers Union, I welded for years pretty much exclusively using 7018 RODS with DC. (7018 are also called Low Hydrogen or LoHi) About the only time we didn't use 7018 was when we were using 6010 RODS on decking. (We'd burn through the sheets on the roof into the joists below.) Miller eTraining has a nice
site for basic
electricity… Sticking - A heck of a frustrating occurrence when the rod sticks to the steel instead of starting an arc. It's usually caused by the heat not being hot enough, or the wrong ROD angle. The end of the rod heats up just enough to fuse to the base metal without starting the ARC. This frustrates the heck out of new welders and that's bad because they then grip the STINGER even tighter making it likely to again stick the rod. (You gotta' relax your hand when welding!) If you jerk the stinger quickly enough, you can free the rod, otherwise you have to disconnect the stinger from the rod, and then break the rod free. (NOTE: Keep your hood down when disconnecting because it will make a bright flash.) If FLUX breaks off of the end of the rod, you will need to "long arc" (hold the rod a quarter inch or so off of the plate and let it burn) until it burns the exposed FILLER METAL back down to the flux.) Beginners should practice striking an arc over and over again to learn how to strike it without sticking. Stick-out - How far the wire sticks out from the end of the NOZZLE in MIG welding. Stinger - What we call the ELECTRODE HOLDER in the shop or field. In SMAW there are several sizes of stingers, from lightweight, to heavy industrial sized. In the field we would connect the WORK LEAD on a column for completion of the circuit which allowed us to only drag the stinger lead to where we were welding. (As long as the structure was steel.) It's a heckuva' lot easier doing that than dragging both leads, especially working up high walking around on narrow beams! Stringer Bead - The first bead you should learn after you master starting the arc. Depending on the rod or process, this bead will be done with a drag action on flat surfaces with little or no OSCILATION. After the first bead, the others are run parallel to the first. For flat (see SURFACING) build up welds the beads will overlap each other. In other words, the bead should wash in to about the halfway point of the existing bead. That way there is a good TIE-IN making a connection of the two beads. After several of these are run, the top will be smooth if done correctly. See also CRATER and OSCILATE. Submerged Arc - When I was attending a welding school long, long ago, we toured a massive steel plant. What I saw with them melting down the iron in huge blast furnaces, blowing out drain holes with dynamite, bright orange molten steel flowing into different forms, and all the major machinery, was awe inspiring! So I see this guy sitting by a big machine just kind of watching it with a cig hanging out of his mouth. I asked what he was doing and he politely said "What the hell does it look like I'm doing? I'm welding!" "But there's no arc." I replied. In a mean, sarcastic, cuss-word filled voice, he told me how they use a bare ELECTRODE set with flux spread out on top of the steel. The flux cover kept the arc from being seen, so all he did was set the machine, then sit there and make sure it was working right. It's a very good process for long, continuous welds. Surfacing - Welds used to build up worn down equipment to its original form. A good example is a bulldozer. On the back is a sprocket to make the track go forward or backward. Wheels at the bottom and a few on the top keep it in line. At the other end from the sprocket is an idler wheel. Its purpose is to keep the track in place as it continuously rolls. All of these wear down with use and it is way cheaper to re-surface these welds rather than buy the new equipment, especially for large shops and jobsites. So a build up weld is done, usually with a hard surface rod which does just that; it adds steel and alloys that are very hard so that they don't wear down easy. My first welding job was doing surface welds on idler wheels. I sat there and slowly spun the wheel, running the rod back and forth, about 4" left to right. We started at 8AM. I would weld and figure it must be getting close to lunch and check my watch…it'd be 8:15AM! It was BORING! But you gotta' start somewhere, and by sitting there doing a weave pattern over and over, day in day out, I learned to run a really good continuous bead, so it was a good start. Tack Weld - Small weld used to hold what you're welding on in place until you weld it solid. Used extensively in fabricating, tack welds can be easily broken off if a change needs to be made. It's REAL important that you make sure to weld ALL points on something that has been tacked, especially if it is going to be used structurally. One time a fabrication guy welded a "dog" (temporary lifting eye to hook the shop overhead crane to) on a set of stairs to lift them a few inches off his table. He forgot to take it off and it shipped out with the dog still in place. When it got to the field, an unknowing rookie hooked it on and up it went. On something like that, you tack only on one side so you can knock it off when you're done. That was plenty for the shop, but with it swinging in the air the tacks broke loose and the stairs fell about 26 floors to the ground. Miraculously no one was hurt, but the job superintendent yelled so much it nearly melted the poor shop foreman's phone that day! Make sure to burn completely into a tack when welding, and don't start or stop a weld by or on a tack. Tee Joint - When flat, two plates put together
where if you turned them upside down, they'd look like a T. Hmmm…I wonder
if that's how they got their name?
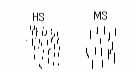
Using a cutting torch, we heat them to what's called "cherry red" (orange to me), then stop and let them began to cool until they're a dull orange. (It's important to keep the tip of the torch a few inches away to make sure it doesn't melt or scar the steel.) Then we quickly dip it into a bucket of mineral oil to quickly cool it. Water will work also, but not as good, and you need to make sure it is cool or cold. After that, you've got a re-hardened hammer. After
use, the crystal structure in the steel changes. In hard steel, the crystals are
small and close together. In softer, more ductile steel, the crystals are longer
and further apart from each other.
When the hammers are exposed to heat and constant beating, the crystals elongate and the ends get dull. We heat them making them flexible and taking the stress away, then cool them quickly which causes them to contract. Your pocket knife blade is very hard steel with a high carbon content, which holds an edge well. If you were to sharpen it on a machine bench grinder and allow it to heat up, it will no longer keep a good edge because you change it's make up. Temper is also something that my boss' lost when I was a wiseass to them. Tensile Strength - Welding RODS such as 7018, 6010, etc. are rated in tensile strength per square inch. The first two numbers tell the tensile strength in thousands. (A low-hydrogen 10018 rod would be the first three.) 7018 has 70,000 pounds of tensile strength per one square inch of weld. 6010 would have 60,000 lbs. That is a lot of strength for a little amount of weld! Tensile strength is the ability to resist being pulled apart by TENSION. Strength is measured at the point it takes to bring the steel or metal to its fatigue point where it fatigues and tears apart. I do a demonstration where I TACK WELD a 6" X 6" plate to the end of a table placing only ½" of weld at each end of the top side with 7018. I then ask students if they would stand on it if it were 30 stories in the air. Most say they wouldn't so I climb up on the table and do that stupid crane stance from the Karate Kid standing one legged on the plate. It shows how much tensile strength two small tacks have, easily supporting my weight. p.s. Don't tack a plate 30 stories high and do the
crane stance! It's for demo only! Tension - Pulling taut or stretching with force. A good example is a rubberband. Tension is where you stretch it apart. Also the kind of headache I used to get when I worked up high and looked down. Test Coupon - I've written about how welders have to prove themselves more than any other trade or career. This is done either by a destructive test that destroys the steel, or a non-destructive test such as x-ray. This is how you become a "certified" welder. On a destructive weld test in structural welding a GROOVE WELD is made with either an open ROOT, or using a BACKUP STRIP. Both sides of the plate are ground flush and cut into 1 ½" strips which are bent in a JIG. The strips are then checked for cracks, or other defects. If none are found, you get the job, fail and down the road you go. Usually two strips from the ROOT and two from the FACE will be bent. Sometimes the strips will actually break in two pieces. If this happens, you might want to check out another career or get to practicing! Throat of Fillet Weld
- This excellent site from TWI shows various fillet throats. Tie-in - After running a STRINGER BEAD a tie-in is made when another stringer bead parallel to the first, is burned halfway into it. Instead of them being two beads side by side, they are intertwined together. Ahhh…they have become one Grasshopper. Tie-in is very important to give strength when making multiple pass welds. TIG Welding (GTAW, Gas Tungsten Arc Welding) - Was called Heliarc, then Tig, now GTAW. However, most welders out in the field still call it Tig. If they call it Heliarc, they're old. WAIT a minute…I've called it Heliarc!!! This welding process joins metals by heating them with a non-consumable tungsten electrode. That means the electrode, which is TUNGSTEN, doesn't melt into the weld the way filler metal in a ROD does. In STICK WELDING the ROD is being consumed as you weld. As you're
burning into the steel, the rod is melting so you need to be pushing
into the steel as you go to compensate for the end of the rod being
consumed, which makes it shorter. It can be done by melting two pieces together with no filler metal, or with a filler rod that you hold and feed into the weld. It takes a lot more skill and patience to Tig weld because you use both hands for different functions and have to feed the rod correctly. That means a lot of coordination, so if you can't walk and chew gum at the same time, it's gonna' take a LOT of practice to get it down. Basic beads are relatively easy, but out of position, exotic metals, pipe and tubing, and confined spaces can be very difficult, and take a long time to master. That said, if you are going to use it for hobby type, working on your race car, motorcycle etc. don't let it intimidate you. With practice you can become proficient. It uses argon, helium or mixtures of inert gases for shielding the weld, and with little to no smoke produced; it is very easy to see the WELD POOL. (Except for Aluminum where the puddle is fairly hard to see.) Tig Torch - Made up of a head to protect the tungsten, collet (sleeve to hold the tungsten) collet body (that's right, it holds the collet), TUNGSTEN and a ceramic cup. The tungsten carries the current which produces an arc. Orifices in the collet direct shielding gas to flow out of the ceramic cup and surround the WELD POOL. Different people hold the torch different ways. I don't care how you hold it as long as you're relaxed and the weld comes out ok! Some torches are air cooled, while others use water or anti-freeze. If you use a liquid cooled torch, you better be real careful not to set it down on a hot piece of metal. Spring a leak and you could get shocked real bad with DC and if you're using AC, you could wake up dead! The smaller the torch, the faster it gets hot. Tungsten - This stuff is hard! It also has the highest melting point of any metal, with only the element carbon having a higher one. This makes it a good ELECTRODE to use in TIG. It is non-consumable whereas stick electrodes are consumable. They burn up as you use them, tungsten doesn't. It carries the arc and makes heat for FUSING the steel. See TIG. If you want to pull a good ask for Wolfram. That is the original name for tungsten because it is mined from ores, one of 'em called Wolframite. After they ask what the heck you're talking about, explain and act surprised at their limited metallurgical knowledge. Undercut - This is the CARDINAL SIN of welding grasshopper! Cutting into the steel with the force of the arc leaves a cut out groove in the weld. If this is not filled back in with filler metal, it leaves a WELD DEFECT which is a weak point that can cause the joint to fail. This can cause property damage, injury and even loss of life. See WELD SIGNITURE. Underfill - is a weld DEFECT that happens when you are not depositing enough FILLER METAL according to the welding specs. Underwater Welding - I'm very tempted to put "welding under water" here. It is either done actually in the water, or in a hyperbaric chamber which is a submersed room where the water has been pumped out. If done in the water it is usually for an emergency repair because there is no way to make a good looking weld underwater, although you can make one that will hold. Here's a site with a great paper on the subject… http://www.metalwebnews.com/howto/underwater-welding/underwater-welding.pdf There are several schools for underwater welding located in different
areas of the nation. Two good ones I know of from visiting or researching
are Visual Inspection - is the easiest and most fundamental WELD TEST. After the weld is made, a qualified instructor, inspector, foreman, superintendent etc. will examine the weld by carefully looking at it. It will be checked for the "Cardinal Sin" of UNDERCUT, POROSITY, UNDERFILL, etc. It only shows the surface, not what is inside. However, you can pretty much see if someone knows what they are doing by visually inspecting their welds. Voltage - is the force that makes the electrons flow through the conductor. (Make sure you don't become a conductor by always wearing gloves when you weld, and staying dry!) It's kind of like when you turn on your garden hose. The water flows because it is pumped. The pump is like the volts, and the water is like the AMPERAGE. Warping - is when the steel deforms either by twisting, bowing, or bending because of heat from the weld. Not usually a problem with thick steel, but a MAJOR problem with the thin stuff. There are steps you can take to prevent warping such as putting the steel in a jig, clamping it down, or immediately cooling it after it is welded. (Immediately cooling can not be used on some metals and alloys because it would make them brittle.) Watch Your Eyes!!! - is what we yell out in our shop to let people know we are about to strike an arc. You should always let people know before you strike an arc so they don't get FLASH BURN. Weave Bead - is usually used on the last bead, or cap of the weld. It is made when you OSCILLATE the rod in a wide pattern back and forth, and in my experience done mostly with 7018 RODS. Weld - although there are many definitions, the one I like is the bonding or fusing of two materials. It can be done with or with out filler rod or wire, and can use all kinds of crazy processes such as explosive, pressure, laser, and others. My late, non-mechanical brother used to ask me if I was going to use "jumper cables and sparklers" when I was STICK WELDING. Many people think of a welder as some dirty guy standing there with a cig hanging out his mouth. In some instances, that's the way it is, but there are MANY welding Processes out there, and new innovations being discovered all the time. You could be working dirty as heck on some greasy conveyor belt system, dangerous as heck way up in the air on a high-rise, or in an absolutely clean, air conditioned and safe aerospace shop. Welding is a heckuva' diversified trade. Weldability - is if a metal or steel can be welded, and with what process? Weld Blanket - Used to keep sparks, molten steel, and SPATTER from burning, scarring, or catching surrounding area on fire when welding or cutting. They're made out of material with a very high resistance to heat. Weld Defect - UNDERCUT, POROSITY, SLAG INCLUSION, and UNDERFILL are all defects which can adversely affect a weld usually causing a crack which weakens it. Weak welds can damage equipment or materials, injure or even kill. Weld Electrode - see RODS. Weld Gauge - Comes in different sizes and is used by the WELDING INSPECTOR to check the size of a weld. Measures how much FILLER METAL is deposited from the ROOT OPENING to the WELD FACE. Weld Gun - In STICK WELDING we use an ELECTRODE HOLDER which is called a STINGER in the field. When FLUX CORED, or MIG welding we use a gun with a trigger on it. When you pull the trigger it causes the wire to feed and activates the electric ARC. Weld Joints - Lap, Butt, Edge, Corner and Tee are the five basic weld joints. Beer and Strip are also a couple of joints many welders know of. Weld Metal - is the melting together of the FILLER METAL (ROD or Wire) and the melted PARENT METAL which forms the welding bead. Weld Pass - Made when you deposit the filler metal on the plate or joint while traveling the length of the PARENT METAL. In some cases one pass is enough while others require multiple passes. Just depends on what you're working on. Weld Pool - see WELD PUDDLE. Weld Positions - in structural steel there's Flat, Horizontal, Vertical and Overhead. Fillet welds are done on a Tee Joint: Groove welds are done on plate: Weld Symbol – is the design on a WELDING SYMBOL that tells what kind of weld you are to make. i.e. Fillet, Lap, Butt etc. http://files.aws.org/technical/errata/A2.4errata.pdf Welding Certification – papers showing what test/procedures a welder has passed. Many people put too much emphasis on being “certified.” You might be able to pass a test 100% in a controlled environment. That is a whole different ball game than making it 30 floors up in the air, with the cold wind blowing down your neck while standing on a 2” wide beam! There are many different certifications and several different institutions that offer them such as…
Welding Procedure – How they want it done. Listed on blueprints or notes to the welder as a WPS or Welding Procedure Specification, it tells you how to prepare the joint, what process to weld it with, size and dimensions of the weld itself, how many passes, and what kind of finish it will have. i.e. chip and brush, machine grind or buff. Welding Symbol – (see also Weld Symbol) - Shows what type of weld, where it's gonna' be, the size and dimensions. It has an arrow that points to where on the joint the weld will be, a reference line where the WELD SYMBOL is, and a “tail” for information on the weld itself. Welding Technique – is how you make the weld. There are different techniques for different welds. For STICK WELDING using 6010 you OSCILLATE the ROD in either circles, or a “whip and pause” where you are whipping the rod in and out of the WELD POOL. This is a radical technique compared to 7014 which you drag steadily with little ossicalation. Some instructors will insist you use ONLY their technique. I don't care if you stand on your head gargling peanut butter as long as you get the weld right. If your technique makes for a sound weld, then it is fine by me. Wire Brush – A real important tool for both pre and post-cleaning a weld. In welding “Cleanliness is Godliness” ESPECIALLY in Mig welding. Mig doesn't work worth a dang if there is paint, rust, or dirt on the metal. Although STICK and FLUXCORE can burn through some paint, rust and dirt, it is still preferable to have a clean surface if at all possible. The cleaner the surface, the better your chance of a good, pure, sound weld. There are hand brushes, brushes that fit on hand grinders, and brushes that fit on bench grinders. After running a pass it is important to brush it good, especially if you are going to run another pass over it. If you are showing your weld to your instructor, or turning it in for a certification test, it is in your best interest to clean the weld properly. The better you clean it, the better it'll look! Weld Procedure – The AWS sez a weld procedure is "the detailed methods and practices including all joint welding procedures involved in the production of a weldment." When I first started welding and I read definitions like that I was like “What the? Who the? Where the? Are you freaking kidding me?” So here's my translation…”how you're gonna' do the weld.” Blueprints have weld procedures which tell what kind of process, and what number, thickness, width and length of the weld is required. On a big job, the superintendent will go over the weld procedures with the general foreman, who will go over it with the foreman, who will go over it with the welder. In a shop the foreman will go over it with the welders. Weld Puddle - or WELD POOL, is the molten metal produced while the weld is being made. It can be made from melting the PARENT METAL alone, the PARENT METAL combined with FILLER METAL, or mostly FILLER METAL in SURFACING. It needs to be protected from atmospheric contaminants by a gas shield produced either from the flux of an ELECTRODE, or SHEILDING GAS. Weld Size – Yes grasshopper, in welding size DOES matter. The size of the weld is located on the WELDING SYMBOL and should not be any more or less than what it calls for. Weld Symbol – is on the WELDING SYMBOL and tells what kind of weld is going to be made. A good site I found illustrating this and welding symbols is http://www.tpub.com/steelworker1/29.htm Weld Test – There are Visual tests, Destructive tests, and Non-Destructive tests in welding. In welding you have to prove yourself more often and in harder ways than any other trade. Visual Test - See VISUAL INSPECTION. Destructive Test – In structural welding two plates welded together are then cut into coupon strips usually 1 ½” wide. The FACE and ROOT OPENING sides of the plate are grinded flush. They are bent in a jig, two face sides, and two root sides, and if they bend with no cracks or POROSITY, or SLAG INCLUSION, you get the job.
If they have cracks, porosity, or slag inclusion…head on down the road. Non-Destructive Test – is used when it is impractical to do a destructive test, or to get a complete view of the weld. There are several types such as X-ray, Magnetic Particle, Ultrasound, and Liquid Penetrate Dye tests. X-ray shows pretty much EVERY part of the weld. If there is ANYTHING at all wrong, it is gonna' show up! Welds done to X-ray codes have zero tolerance. That means you better weld it perfect EVERY weld, EVERY time! In my years as a structural welder in the Iron Workers union I tested on jobsites with Destructive Bend tests, or X-ray. There are many other tests done, but here I'm only describing these two. You can find more on the other testing methods in most any welding journal, or search ‘em on the net.
|